Ads 468x60px

Dessert

Showing posts with label Dim Sum. Show all posts

Thursday, June 30, 2011

Pau of Sorrows

.
So why is the dish named that way? And what's with the sorrow thingy? The truth is, that's how I felt while preparing the pau.....huhuhu. I was browsing the net just before I decided to make these pau which brought me to a website of a mixed ( Malay + Caucasian ) couple. I was reading & reading & boy, this is one perfect couple, I said to myself.

The husband is so damn good looking , the kids are really gorgeous and she's just one plain Jane, to be honest. Yet, he loved her so very much ~ big sigh ~ Well, that's all I could do - sigh, sigh & continue sighing. I am very happy for the whole family while at the same time feeling tremendously envious with a dash of blue. Again.....sighing the longest sigh.

Anyway, back to my pau story. You didnt like it - it's hard, you said....huhuhu. C'mon, pau are best eaten warm. Of course it's hard coz it's already cold, my dear ( ayat cover line ni .....hehehe ). Anyway, for a first timer like me, I consider my pau a success, regardless of what my personal food critic says. Period.


Photobucket

Beef & Black Beans Pau
Source : Jane Chew


Ingredients A

300 gm Pau flour
150 gm fresh milk
50 gm castor sugar
1 1/2 tbsp shortening
1 tsp yeast
A pinch of salt


Ingredients B

1 tsp double acting baking powder
1 tbsp water


How To

1. Mix all ingredients A & knead for 8 - 10 mins till dough is smooth.

2. Cover with a piece of wet cloth & leave to prove until it has doubled in size.

3. Mix (b) together & pour into dough & knead well till it is smooth again.

4. Cover & allow dough to rest for another 15 mins before shaping.

5. Divide dough into 16 portions, around 36 gm each.

6. Wrap in fillings & seal tightly. ( I've made the red beans & beef fillings )

7. Place on a baking paper & arrange into steaming tray.


The green dots denotes the filling which in this case is Red Bean


8. Prove for another 30 mins before steaming.

9. Steam at high flame for 10 mins. Allow a small gap by lifting the lid after steaming for 5 mins.

10. Turn off heat & let it sit undisturbed for another 3 - 5 mins.

11. Serve hot.


My beef pau -ready to be frozen


Monday, June 27, 2011

Beancurd Rolls

.
This is a new recipe of mine inspired by the many Dim Sum dishes I've tried before. I was doing the groceries at Tesco one day when I saw the soft beancurd sheet which immediately gives me an idea for this special recipe.


The fillings are more or less the same as Siew Mai but for this particular roll, I've added some black fungus, carrots & water chestnuts. The outcome as you've tasted it was simply amazing. The only setback was that, it was a bit salty to my taste but surprisingly you didnt think so. Maybe bcoz you love it so much that it overrules your taste buds.

From my observation / investigation, the beancurd sheet was not as tasteless as I thought it was. I tasted both the sheets & fillings separately & that's how I came to know that the beancurd sheets were already salty. Hence, no salt should be added in the fillings anymore. Points to be noted.

Let's check out the recipe of this delicious delicacy :


Photobucket

Beancurd Rolls
Source : Belle du Chef


Ingredients

Few pieces of soft beancurd sheets
200 gm minced chicken
150 gm minced prawns
3 pcs water chestnut, finely chopped
1/2 cup shredded carrots
1 stalk spring onion, finely cut
2 pcs black fungus, finely shredded
1 tbsp chicken stock granules
1 tsp sesame oil
2 tbsp cornstarch
1/2 tsp pepper


How To

Mix all ingredients together (except the beancurd sheets).

Lay the beancurd sheet & spray some water to soften it. Be careful not to over-spray as it'll make the sheet becomes too soft, thus difficult to roll.

Spread the fillings mixture evenly on the sheet leaving approximately 1 inch of space on each side.


Then carefully roll the sheet by folding the edges from both the sides first. Dab some water at the end of the roll to seal it.


You can either fry or steam the rolls whichever is preferred.

Cut the fried / steamed rolls into 1 cm thick pieces & serve with chilli sauce.


Thursday, June 23, 2011

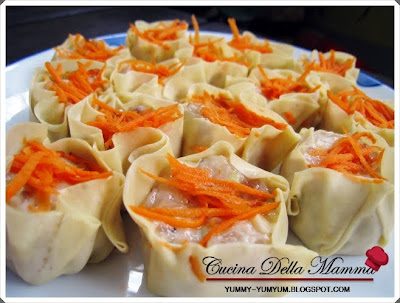
Siew Mai (Steamed Chicken Dumplings)

.
Marsya Dearie,

You know how much I love dim sum & I know you like it too (tho not as much . I blame it on those Chinese blood that runs through my veins which makes me adore Chinese food so much.

For your info, Dim Sum is a Cantonese term for a type of Chinese meal that involves small individual portions of food. There are various types of foods included in a Dim Sum meals such as char siew pau (steamed buns), dumplings, cheong fun (rice noodles rolls) etc. Among all, siew mai (steamed chicken dumplings) has been my all time favourite.

Finding a halal dim sum in town is not as easy as looking for a nasi lemak or capati. I've tried buying the frozen ones at the supermarket but the taste are so disappointing...... or it might just be my taste bud which has becoming pickier & pickier these days ~ sigh ~

After googling a few recipes on Siew Mai & comparing each & every one of them, I've come up with my own recipe for this favourite dish of mine. In one of those recipes, water chestnut is one of the ingredients & I thought of adding it too but unfortunately I couldnt find it at the supermarket. Maybe some other time then.

Nevertheless, I'm not trying to boast here but this Siew Mai was the best chicken dumplings I've ever tasted. I admit that the preparation was a bit tedious but the satisfaction is simply priceless !

Photobucket

Siew Mai
Source : Belle du Chef


Ingredients

200 gm minced chicken
200 gm prawns, minced
1/2 tsp pepper
1 tsp chicken stock granules
1/2 tsp salt
1/2 tsp sesame oil
3 pcs black mushroom, soaked & finely chopped
4 stalks spring onion (white part only), finely chopped
2 tbsp tapioca flour
Shredded carrots
Wonton skins


How To

1. Mixed all ingredients (except for wonton skin & carrots) together.

2. Set aside in the fridge for 20 minutes.

3. Trim wanton wrappers into round shape and wrap some filling in it.

4. Place a tablespoon of filling on each wrapper, gather up the sides and leave the center open.

5. Garnish the top with some shredded carrot.

6. Steam at high heat for about 10 mins.

7. Serve hot either on its own or with chilli sauce.


Wednesday, April 28, 2010

Salted Cabbage With Tofu Soup

Our second recipe for this week is a soup......and again, it's another simple dish that's gonna impress your taste bud. FYI, all of the recipes that will make an entrance in this blog this week are those of the healthy ones - which is of course, in parallel with my diet regime.....hehehe.

This particular recipe was inspired by the soup I had in Qing Zhen Chinese Muslim Restaurant @ Novotel Hotel a couple of weeks ago. I had lunch there with my other colleagues while entertaining our counterpart from Japan. It was a dim sum lunch buffet where one of the menu was the Salted Vegetable With Bean Curd Soup.


I fell in love with it the moment it makes physical contact with my tounge. The sourish taste of the salted cabbage blend in very well with the plain taste of the tofu. I love this particular soup very much that I planned to construct the recipe myself. This way, I could have it as often as I wish to. Based on my visual observation & the sensitivity of my tongue, I managed to come up with the recipe - with some modifications to localize the taste.

So, here are all the ingredients required :


Cooking it tremendously easy.

1. Fry the ginger, garlic & the crushed white pepper with a bit of oil, till fragrant.

2. Add in the chicken & continue frying for a minute or so.

3. Then, add in the water & wait till it boils.

4. Put in the salted vege & tofu. Salt to taste.

5. Finally add the leaks & turn off the flame.

6. You can now enjoy your soup - jangan lupa Bismillah !