Ads 468x60px

Dessert

Thursday, July 7, 2011

Prosperity Burger

.

Since I've started working again, I havent posted any recipes yet so far. It's not that I didnt cook - I did, it's just that I couldnt possibly find the time to upload the recipes here *sigh*. It's hard maintaining 2 blogs at the same time & guess what....I am about to have another one - yeah, call me crazy, by all means.

Anyway, this morning I've made a Prosperity Mini Burger for breakfast. You seemed pleasantly surprised seeing me assembling the pieces together during your regular morning rounds to the kitchen. And speaking of that, do you know that you are more or less putting pressure on me when you came into the kitchen every morning asking me what's the breakfast for the day.

I am glad you loved my choice of food for this morning - something different but bombastic indeed. I love black pepper & therefore this prosperity burger is definitely one of my fave. You, on the other hand doesnt favour black pepper that much, hence it's always a no-no for you.

Knowing this fact, I knew from the very beginning that I'm taking a big risk cooking something you dont like. But CNY is still months away & dont think I could wait that long for a bite of the prosperity burger. So, with that bit of selfishness in me, I've surprised you with this meal. And surprise...surprise.....you loved it !

So, lets check out the recipe here hon :


Photobucket


Prosperity Mini Burger
Source : MamaFami


Main ingredients :

Burger rolls ( I used the small rolls, 2" diameter rolls)
Beef burger or Chicken Burger
Onion ~ sliced
Tomato ~ sliced
Lettuce ~ sliced


The minimized beef patties for my mini burgers


The mould used for the beef patties


Blackpepper Sauce

2 cups chicken stock (I just add water and chicken cube)
1/4 cup fresh milk
1 - 2 tablespoons blackpepper ~ coarsely crushed
1/2 onion ~ diced
2 tablespoons sweet soya sauce
1 tablespoon oyster sauce
1 tablespoon margarine
3 tablespoons cornflour ~ mix with a bit of water
salt and sugar ~ if necessary

Method :

1. Heat oil and add in diced onion. Fry till fragrant. Add in the chicken stock and let it boil.

2. Add in crushed black pepper, sweet soya sauce, margarine, oyster sauce and sugar.

3. Finally pour in the cornflour mixture, a little at a time till you get the desired thickness.

4. Place the beef/chicken burger on a non stick pan and fry till cooked, without oil.

5. Dip the cooked burger into the sauce then take it out and place it on the rolls, layered with lettuce, tomato and onion.

6. Enjoy....


Thursday, June 30, 2011

Pau of Sorrows

.
So why is the dish named that way? And what's with the sorrow thingy? The truth is, that's how I felt while preparing the pau.....huhuhu. I was browsing the net just before I decided to make these pau which brought me to a website of a mixed ( Malay + Caucasian ) couple. I was reading & reading & boy, this is one perfect couple, I said to myself.

The husband is so damn good looking , the kids are really gorgeous and she's just one plain Jane, to be honest. Yet, he loved her so very much ~ big sigh ~ Well, that's all I could do - sigh, sigh & continue sighing. I am very happy for the whole family while at the same time feeling tremendously envious with a dash of blue. Again.....sighing the longest sigh.

Anyway, back to my pau story. You didnt like it - it's hard, you said....huhuhu. C'mon, pau are best eaten warm. Of course it's hard coz it's already cold, my dear ( ayat cover line ni .....hehehe ). Anyway, for a first timer like me, I consider my pau a success, regardless of what my personal food critic says. Period.


Photobucket

Beef & Black Beans Pau
Source : Jane Chew


Ingredients A

300 gm Pau flour
150 gm fresh milk
50 gm castor sugar
1 1/2 tbsp shortening
1 tsp yeast
A pinch of salt


Ingredients B

1 tsp double acting baking powder
1 tbsp water


How To

1. Mix all ingredients A & knead for 8 - 10 mins till dough is smooth.

2. Cover with a piece of wet cloth & leave to prove until it has doubled in size.

3. Mix (b) together & pour into dough & knead well till it is smooth again.

4. Cover & allow dough to rest for another 15 mins before shaping.

5. Divide dough into 16 portions, around 36 gm each.

6. Wrap in fillings & seal tightly. ( I've made the red beans & beef fillings )

7. Place on a baking paper & arrange into steaming tray.


The green dots denotes the filling which in this case is Red Bean


8. Prove for another 30 mins before steaming.

9. Steam at high flame for 10 mins. Allow a small gap by lifting the lid after steaming for 5 mins.

10. Turn off heat & let it sit undisturbed for another 3 - 5 mins.

11. Serve hot.


My beef pau -ready to be frozen


Asam Pedas Rebus Nenas

.
This is another version of Asam Pedas - the healthier version, I would say as no oil is being used to prepare it. Other than pineapples, you can also use other vegetables like brinjals or ladies fingers. But to me, pineapples are the best.

The sweetness of the pineapples created an amazing balance with the spiciness of the chillies. You'll have a complete hot, sweet & sourish taste in this one special dish. This time around, I've used the Tilapia fish, but any other white meat fish ( like tenggiri, kerisi, siakap, merah etc ) can do the job as well.


Photobucket


Asam Pedas Rebus Nenas
Source : My Mom


Ingredients

1 Tilapia fish
1 tbsp chilli paste
1 cm fresh tumeric
4 shallots
1 garlic
1 cm3 belacan
1 in galanghal, bruised
1/2 pineapple, cut into pieces
8 - 10 pcs kesum leaves
1 pc asam keping
Enough water


How To

1. Pound the shallots, garlic, tumeric & belacan together & mix with the chilli paste.

2. In a pot, combine the chilli paste with water & other ingredients, including the pineapple cuts.

3. Add salt & sugar to taste.

4. Serve with white rice.


Massalavadei

.
This is the same scenario as the Fried Apple Pie. When I was busy preparing this kuih in the kitchen, you came in & ask what was I doing? After I told you that I was making a Massalavadei, you make a sulking face while telling me that you dont like it.

But then, again I've proven you wrong. After frying a few pieces, you end up eating most of them. All I did was to sit back & enjoy looking at you finishing the kuih you "dont" like!


Photobucket


Massalavadei
Source : Belle du Chef


Ingredients

1 cup of dhall, soaked overnight
1 yellow onion, chopped
2 red chillies, chopped
1 green chilli, chopped
3 sprigs curry leaves, chopped
1 tbsp anchovies granules stock
1 tbsp anise seeds, coarsely pounded
1 tsp salt (or to taste)


How To

1. Using the dry blender, blend the dhall leaving some un-blended.

2. Place all the dhall in a big bowl & combine it with all other ingredients.

3. Shape dhall mixture into small balls, slightly press it into a disc shape.


4. If the mixtures are too soft, add 1 - 2 tbsp cornflour to thicken it.

5. Prepare fryer or deep skillet at medium heat with oil.

6. Place the dhall dough into the hot oil.

7. Fry each on both sides until golden brown.


Paru Goreng Berempah

.
Paru or cow's lung is one of our favourite dish. Ada orang pantang makan organ2 dalaman camni tapi macam kita pulak, pantang jumpa....hahaha. Well, life is short......so, we ought to enjoy it while can, right?

Paru is best cooked with sambal - though you can also makes rendang with it. In both occasions, the taste is simply awesome. The best Paru Goreng Berempah I've ever tasted was during my uni years where my housemate used to bring back some, as prepared by her Javanese auntie. It has a very strong coriander taste which blended so well with the lungs.

I've tried varieties of Paru Goreng Berempah's recipes but none of them could even get close to my friend's auntie's recipe. Hers is simply exceptional. This particular recipe I'm writing here is the best I could come up with. Well, takde rotan akar pun berguna, kan ?


Photobucket


Paru Goreng Berempah
Source : Belle du Chef


Ingredients

500 gm cow's lung / paru
1 cm ginger, finely sliced
1 1/2 tbsp salt


To Be Pounded

1/2 tbsp coriander
1/2 tbsp aniseed
1/2 tbsp cumin
1 cm fresh tumeric


To Be Coarsely Blended

10 pcs dried chillies
4 pcs red chillies
1 big onion


How To

1. Boil the lungs with ginger & salt till tender. Then slice them approximately 5 mm thick.

2. Marinate the lung slices with the pounded spices & leave aside for 30 mins or more.

3. Deep fry the marinated lungs & set aside.

4. Using the same oil, fry the blended ingredients till fragrant.

5. Add salt & sugar to taste.

6. Then toss in the fried lungs & mix well.

7. Serve with white rice.


Nasi Ulam

.
Marsya, you are really one of a kind, dear. While other kids ( adults too ) despise vegetables, you on the other hand cant eat without one. And on top of that, you love all those ulams too where you could actually it them raw. That's what we called "mummy's gal" !

Since you love those ulams, nasi kerabu has been one of your favourite dish. But that's not what I'm cooking today (since I dont know how to make nasi kerabu.....hehehe). Today's special dish would be something similar to Nasi Kerabu where lots of ulams are involved. It's called Nasi Ulam - one complete, balanced dish where all important nutrients like carbohydrate, protein, minerals & fiber (minus the fats) are all in. And most importantly, the taste is as good too !


Photobucket


Nasi Ulam

Source : Belle du Chef


Ingredients

3 cups cooked rice
2 stalks daun kesum
1 pc daun kunyit
1 handful of pegaga
2 - 3 stalks ulam raja
2 - 3 stalks daun selom
1 kembong fish, grilled & shred
1/2 cup anchovies
1 cup fresh coconut flakes
1 - 2 tbsp black pepper
2 red onions
Salt to taste


How To

1. Chop finely all the leaves & put aside.

2. Fry the anchovies (without oil) till crunchy & pound them.

3. Fry the coconut flakes (without oil) under medium heat, till golden brown.

4. Pound the black pepper with onions till fine & put aside.

5. Grill the fish, debone & shred to small pieces.

6. Mix all ingredients with the rice & add salt to taste.

7. Optionally, you can add some anchovies' sauce (budu) which has been mixed with lime juice & some bird's eye chillies.


Wednesday, June 29, 2011

Custard Puffs

.
I've made this puffs once, a few years back when you were still too small to appreciate food. But then, it's a good thing that you didnt know much about food then since my first attempt to make these puffs was a complete failure. I can imagine your sarcastic remarks & looks after taken your first bite....euwwww scaryyy !!!

Anyway, this time around equipped with a few years cooking experience behind my back, I would say my Custard Puffs are a great success. My puffs shrunk the first time I did it but this time they are just perfect - crispy & puffy like they are supposed to be. And with these kindof puffs, I am more than pleased to present them to my personal food critics for I know I'll be getting a big hug from her !


Photobucket

Custard Puffs
Source : HomeKreation


Ingredients

250 ml water
78 g butter
93 g Flour
4 eggs


How To

1. Place water & butter in a saucepan & boil.

2. Remove from heat & add flour, all at once.

3. Beat with wooden spatula until well mixed.

4. Return to heat & stir until smooth & non-sticky. Set aside to cool.

5. Beat in egg, one at a time until light.

6. Pipe or spoon onto greased baking tray.

7. Bake @ 250C for 10 mins, then 180C for 15 mins or till golden.

8. Inject custard filling.


Ingredients ( for the custard )

2 egg yolks
50 g castor sugar ( I add another 1 tbsp )
30 g flour
200 ml fresh milk


How To

1. Mix all ingredients & stir under low heat till mixture becomes thick & glossy.

2. Alternatively, microwave for 5 mins & stir every 1 min. ( anyway, I didnt try this method )


Monday, June 27, 2011

Beancurd Rolls

.
This is a new recipe of mine inspired by the many Dim Sum dishes I've tried before. I was doing the groceries at Tesco one day when I saw the soft beancurd sheet which immediately gives me an idea for this special recipe.


The fillings are more or less the same as Siew Mai but for this particular roll, I've added some black fungus, carrots & water chestnuts. The outcome as you've tasted it was simply amazing. The only setback was that, it was a bit salty to my taste but surprisingly you didnt think so. Maybe bcoz you love it so much that it overrules your taste buds.

From my observation / investigation, the beancurd sheet was not as tasteless as I thought it was. I tasted both the sheets & fillings separately & that's how I came to know that the beancurd sheets were already salty. Hence, no salt should be added in the fillings anymore. Points to be noted.

Let's check out the recipe of this delicious delicacy :


Photobucket

Beancurd Rolls
Source : Belle du Chef


Ingredients

Few pieces of soft beancurd sheets
200 gm minced chicken
150 gm minced prawns
3 pcs water chestnut, finely chopped
1/2 cup shredded carrots
1 stalk spring onion, finely cut
2 pcs black fungus, finely shredded
1 tbsp chicken stock granules
1 tsp sesame oil
2 tbsp cornstarch
1/2 tsp pepper


How To

Mix all ingredients together (except the beancurd sheets).

Lay the beancurd sheet & spray some water to soften it. Be careful not to over-spray as it'll make the sheet becomes too soft, thus difficult to roll.

Spread the fillings mixture evenly on the sheet leaving approximately 1 inch of space on each side.


Then carefully roll the sheet by folding the edges from both the sides first. Dab some water at the end of the roll to seal it.


You can either fry or steam the rolls whichever is preferred.

Cut the fried / steamed rolls into 1 cm thick pieces & serve with chilli sauce.


Saturday, June 25, 2011

Fried Mee Lidi

.
My Dear Marsya,

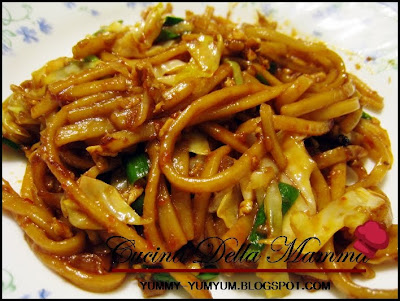
As far as I know, Kuay Tiaw is your number one favourite noodles and Mi Lidi comes next, while bee hoon is a no-no. And speaking of that, when was the last time I fried bee hoon at home ? Must have been ages, I supposed. Hehehe...no worries dear - I can always get it elsewhere if I feel like having it.


FYI, this is how your Mi Lidi looks like. And bear in mind that you can only get it in Kuantan. Dont ask me why but that's the fact - they are just not sold in KL. I've checked every shops, markets, hypermarkets & supermarkets in KL but none of them has it here. If you noticed, every time we went back to Kuantan, I always took the opportunity to stock up these noodles. I bought like 10 packets of them - one shot.

One thing with this Mi Lidi is that, it is best fried with dried prawns. You can still use the fresh ones though but personally, I preferred the dried prawns better.


Photobucket


Fried Mee Lidi
Source : Belle du Chef


Ingredients

1/2 packet of Mi Lidi
3 shallots, pounded
6 garlic, pounded
1 - 2 tbsp chilli paste
1 large eggs
1/2 cup of dried prawns, soaked & pounded
2 cups of shredded cabbage
A handful of chives, cut into 1 cm length
1 tbsp chicken stock granules
1 tbsp oyster sauce
1 tbsp dark soya sauce
1 tsp salt (or to taste)


How To

Boil water, add the noodles & simmer till the noodles are cooked.

Remove from the fire & drain out all the water. Run cold water through it to discharge excess starch.

Beat the egg lightly & make a scramble out of it. Set aside.

Heat oil & fry the onions & garlic till fragrant. Add in the chilli paste & stir well till the chilli is completely cooked & the colour turned into a darker shade.

Then add the dried prawns & stir for another minute. Put in the oyster, dark soya sauce, salt & a bit of sugar.

Finally, add the scrambled egg, cabbage & chives, along with the boiled noodles. Mix well.

Dish out once the vegetables are cooked. Ready to serve.


Friday, June 24, 2011

Fried Apple Pie

.
I never did like Apple Pie - and so do you, right? So, watta heck am I cooking it for then? I dunno what's wrong with me lately but my passion for cooking has been so overwhelming these days. Everyday, I would wanna try & cook something new, even though it's something I dont like. This Apple Pie is one excellent examples of how passionate I am in cooking.

I initially fried 2 pcs for food sampling but to my surprised, you asked for more. My oh my.....you dont know how much this means to me. You loves my Apple Pie ! Thank you dear !


Photobucket

Fried Apple Pie
Source : Forum Cari


Ingredients
2 green apples, diced
1 cm cinnamon
1/3 cups sugar
2 - 3 pcs of puff pastry


How To

Mix all ingredients in a sauce pan & mix well under low heat.

Cook until the apples become soft & till you get the right consistency. Then, mash a quarter of the apple mixture & leave the balance as it is. Set aside to cool.

Meanwhile cut the puff pastry into 2 & place a teaspoonful of the filling at one side of the pastry. Cover it with the the other side of the pastry.

Seal the dough by pressing the edges with a fork. Cut a few slits on top of the dough.


Heat oil under low heat & fry the pie till golden brown.

Serve hot.


Kangkong Masak Halba

.
Kangkong or water spinach is your no. 1 favourite as far as vegetables are concern, isnt it? You would still asked for Kangkong Belacan every time we dine out even though we've just had it the day before. That's how much you love kangkong. You just cant get tired of it, right?

This Kangkong Masak Halba is a recipe inherited from my mum. I love kangkong cooked this way. Not only it's easy to cook, the taste is splendid too. The sweet potato add the sweetness to the soup along with the fenugreek-y taste. Simply awesome.


Photobucket

Kangkong Masak Halba
Source : My Mom


Ingredients

A handful of kangkong
1/2 onion, finely sliced
1 red chilli, julienne
1/4 cup of anchovies, pounded
1 pc of sweet potato, cut into desired shape
1/2 tbsp fenugreek
1 bowl of water
Salt to taste


How To

Heat the oil & fry the onion & chilli till fragrant. Add in the anchovies & fry for a while.

Pour in water & put in the sweet potato. Cook till the potato is soft.

Then, add the kangkong & fenugreek followed by salt to your taste.

Dish out & serve hot with rice.


Chicken Soup

.
Both of us are chilli-crazies. We just cant live without chillies, cant we? Chillies really "spice" up our life. And bcoz of that, soup is never in our favourite list - be it beef, chicken or fish.

But then, once in a while it's quite nice to have a soup for lunch. Too much of everything (chillies especially) is not good anyway. The chicken soup I'm cooking today is based on a special recipe from Ms. Tulip of MYR. It's a special recipe that makes a very delicious soup indeed. My appreciation to Ms. Tulip for sharing the wonderful recipe....muahhhhh.

Photobucket

Chicken Soup
Source : Ms. Tulip


Ingredients

1/2 chicken
1/2 onion, finely blend
1 garlic, finely blend
1/2 inch ginger, bruised
1/2 stick of cinnamon
2 pcs. cloves
1 pc. anise
2 pcs. cardamon
1 potato, cut into 4 pcs
1 small carrot, cut into desired shape
1/2 bowl of water
Pepper, salt & chicken stock
Celery, scallion & fried onions


How To

Boil the water, add in the spices, turn off the flame & cover the pot.

Set it aside till the it becomes lukewarm. Strain the spices & keep the lukewarm water aside.

Heat the oil & fry the onion & garlic till fragrant. Then put in the ginger & spices, fry for a while.

Add in chicken & make sure they are well mixed with the fried ingredients. Fry under a small flame for about 1o min.

Pour in the lukewarm water with another bowl of plain water. Add more water as you desired.

Once the soup boils, add in the potato & carrot. Then followed by salt, pepper & chicken stock to your taste.

Turn of the heat & sprinkle with celery, scallion & fried onions. Cover the pot completely for about 20 mins to let the aroma being absorbed into the soup.

Serve hot with rice / bread / on its own.